| WS-FTP for Windows |
WS-FTP for Windows is an FTP (File Transfer Protocol) program usable on Windows 95 and Windows NT. To use it, your workstation must first be connected to the Internet (either directly or through dialup). If WS-FTP is installed on your PC, you only need to select Start/Programs/Ws_ftp/WS_FTP95 LE (or some variation of WS-FTP). A window will pop up, with the following sub-window:
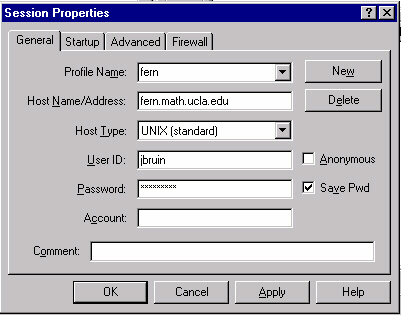
Creating a profile:
If you want to save and name a profile that you will probably repeatedly use to access a particular machine (remote host), click on the New button in the top right of this box. All lines should blank out, and you can enter new information.
First, type a name in the box next to Profile Name: (you can call it anything you want). For the host name, it is best to specify the valid DNS, or, to be absolutely sure you make a connection, specify the valid IP address (do this in case the DNS lookup is not functioning on the remote host). Type that in the box next to Host Name/Address. For the Host Type, select the type of machine you are accessing.Generally, you will probably access either a UNIX (standard) host, or Microsoft NT host, but there are many others (including Amiga!) that you can access by clicking on the down arrow at the right hand part of the box.
Do NOT have account on REMOTE host:
If the remote host is one upon which you do not have an account, you need to select Anonymous (for Anonymous FTP). Type in the word Anonymous as your User ID, and type in your full account name (e.g. jbruin@math.ucla.edu) in the box next to Password (this is standard for remote hosts that allow Anonymous FTP connections).
DO have account on REMOTE host:
Otherwise, if you do have an account on the remote host, then you need only type in the "username" portion of your account name (e.g. jbruin) in the box next to User ID, and your actual "password" in the box next to Password (see above). If you don't want to retype your password every time you access your account using this profile, select Save Pwd (see above).
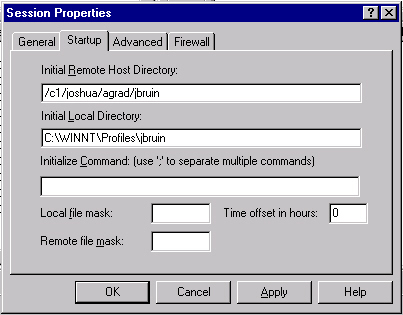
Specifying Remote/Local Directories:
First, select the Startup tab. Then, you can select the Remote Directory (if you know it) by typing it in the space under Initial Remote Host Directory, and specify the Initial Local Directory as well (if you know that too).
If you don't know either of these directories, you can simply connect to a remote host (without, and will end up in their default ftp directory -- and the default local directory will be the location of the ws-ftp program (it actually could be some other default directory, like the location of your username's files). After you move to the correct directories (both Remote and Local), then you can select an Option which allows you to Save Current Directories as Connection Directories (see below).
Once you've configured a profile the way you like it, click on OK. The window in the background (remember, the current window was a "sub-window") will become active, and will connect to the remote host. You should see a "Transfer Complete" message at the bottom. If not, you did not make a good connection (maybe the password was wrong, or the username invalid). The following is an example of a successful ftp connection.
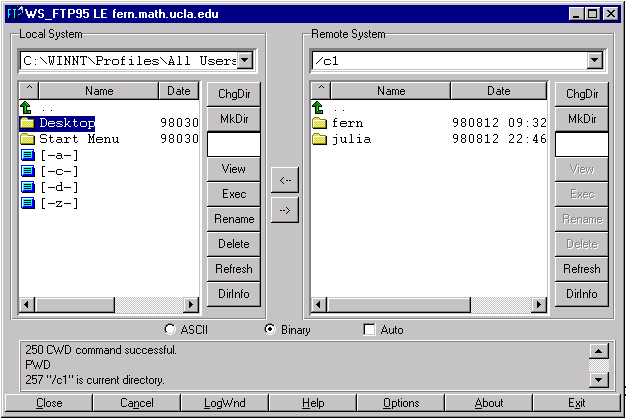
In this window, the Local System is on the left, and the Remote System is on the right. We can change directories on each side by clicking on the ChgDir button. Or, we can click on the upward pointing green arrow to move to the "parent" directory of the current directory.
Transferring a file from the Local System to the Remote System (uploading):
In this example, the folder Desktop is selected on the Local System. It was selected by pointing the cursor over the folder, and clicking on it. To transfer this folder and its contents to the Remote System, simply click on the right pointing arrow button located in the middle bar. You'll see a bar pop up that indicates the size of the file, and a level indicator showing what fraction of the transfer is occurring. After the transfer is complete, you will see the entire right side refresh, and pop up with the new directory (and it's contents) included. Of course, your account has to have write access on the Remote System in order to do this.
Transferring a file from the Remote System to the Local System (downloading):
In normal ftp operation, you'll probably be doing this; i.e., you will be "downloading" a file into your computer rather than "uploading" a file onto someone else's computer. To transfer a file or folder on the Remote System to the Local System, select the file or folder, and then click on the left pointing arrow button located in the middle bar. The same "loading" and "refreshing" actions take place, except on the left hand side.
Keeping the current Remote and Local directories for future connections:
If you want to do this, select Options (on the bottom bar). A new window pops up, and at the bottom of the new window is a button marked: Save Current Directories as Connection Directories. Click on the button, and it will store the current directories in the Startup profile.
After you're finished ftp'ing, click on the Close button at the bottom left, and it will exit your current ftp session. If you wait too long before you actually perform the file transfer, the "ftp connecction" will time out, and you will have to re-establish it.
ra:9/28/98